Prompts
介紹
Laravel Prompts 是一個 PHP 套件,用於為您的命令列應用程式新增美觀且使用者友善的表單,具備類似瀏覽器的功能,包含預設提示文字(Placeholder)與驗證機制。
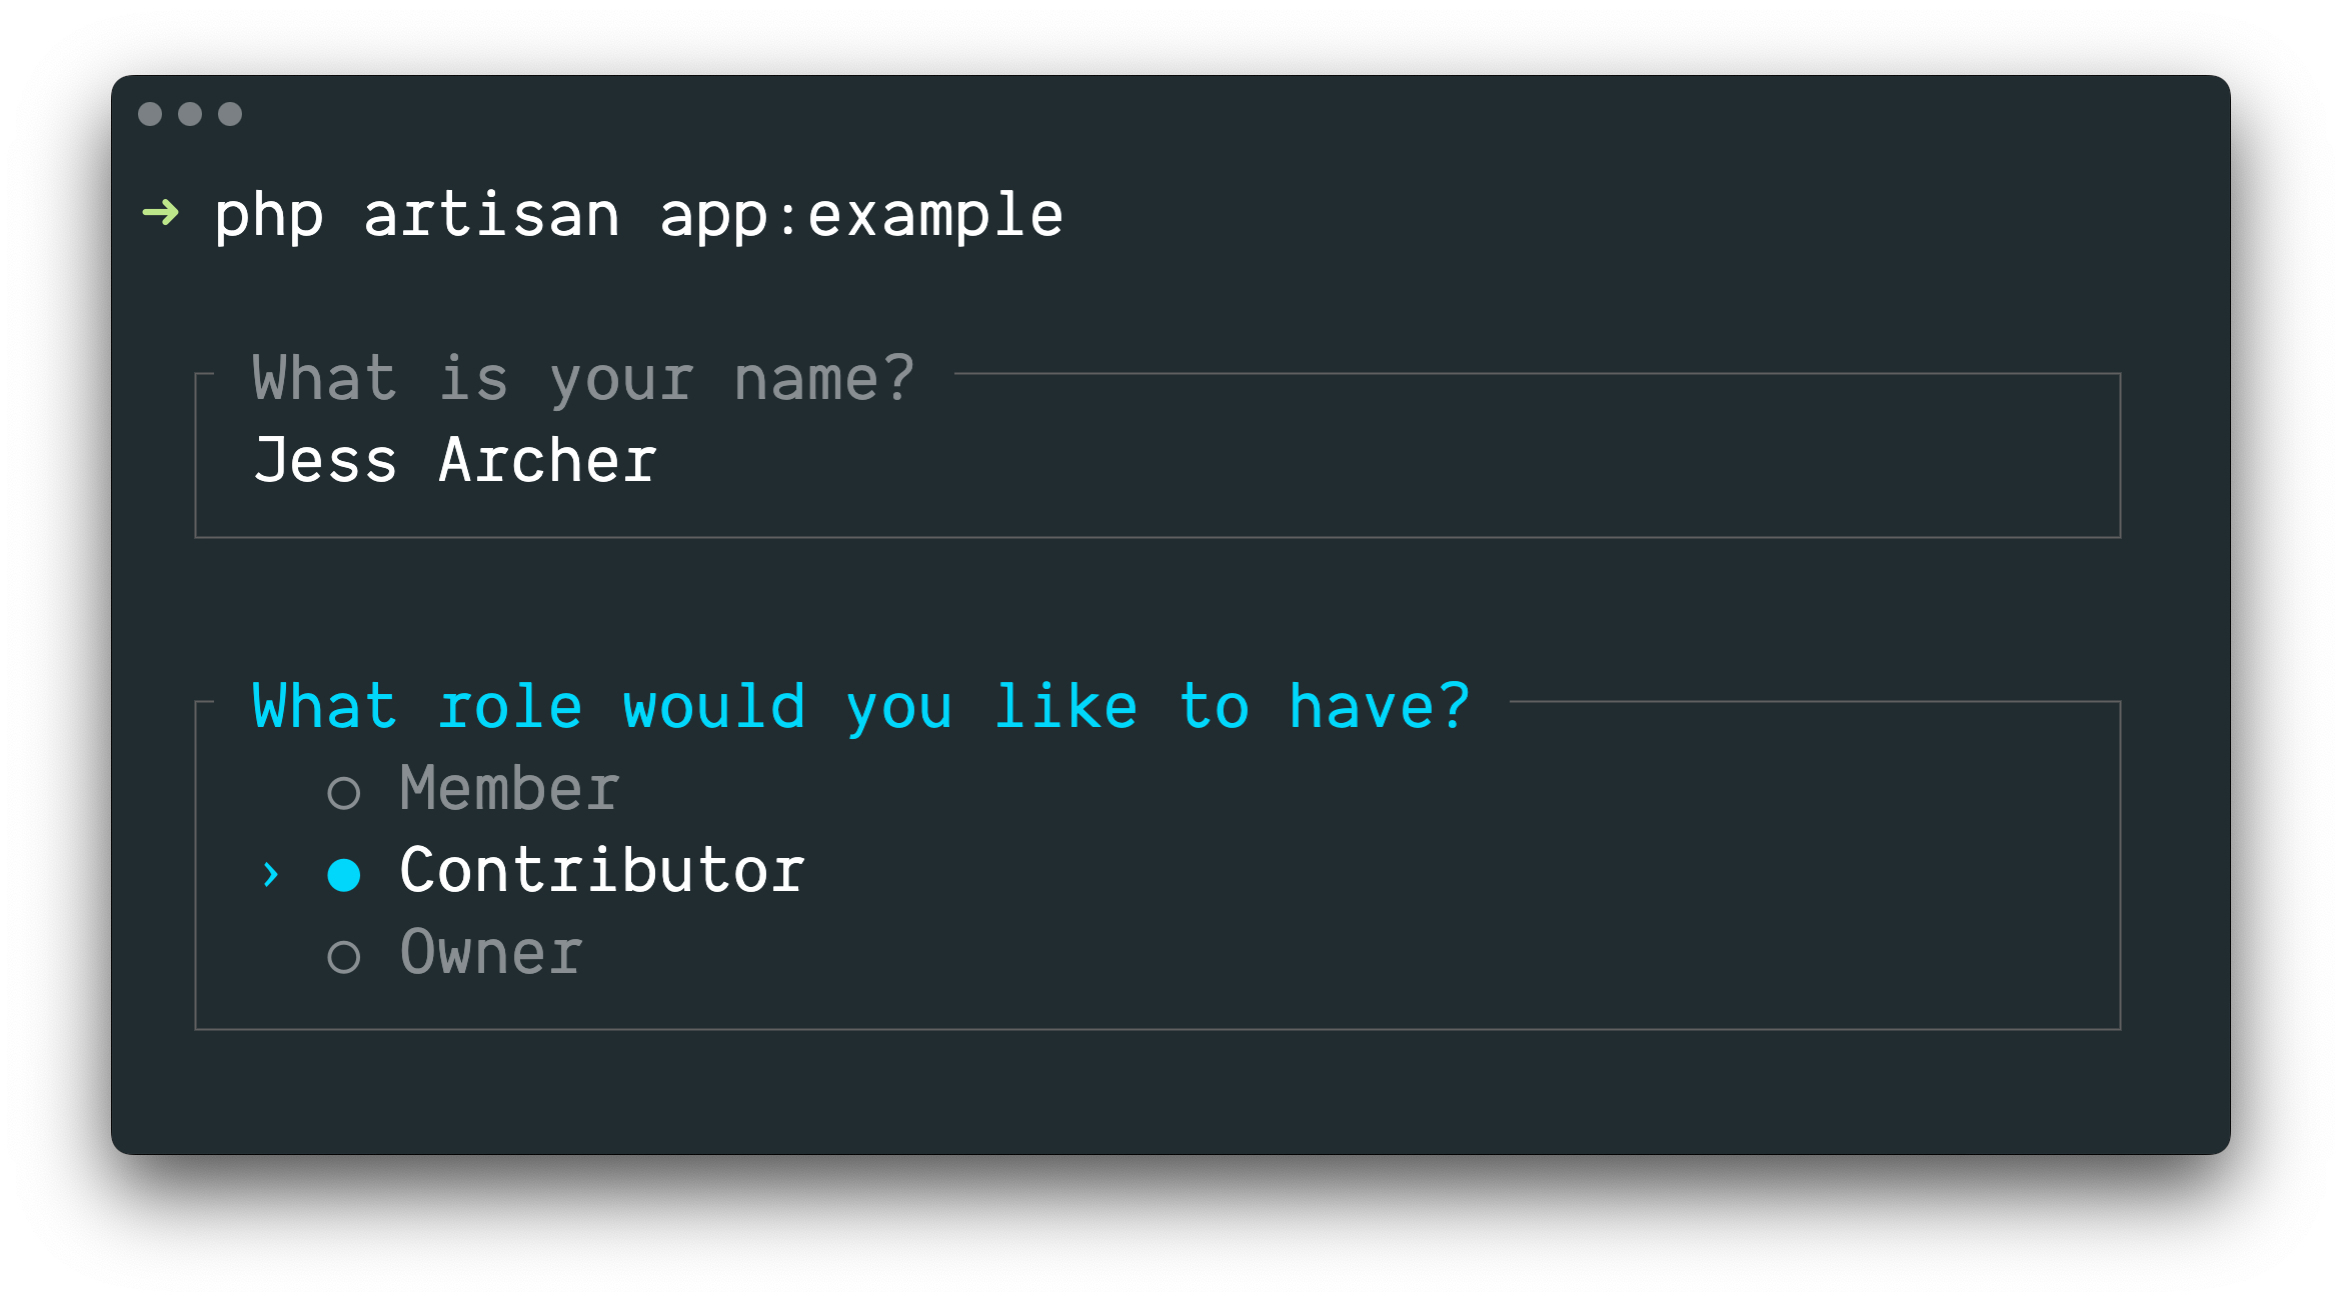
Laravel Prompts 非常適合用於在 Artisan 主控台指令 中接收使用者輸入,但它也可以在任何命令列 PHP 專案中使用。
📌 備註
Laravel Prompts 支援 macOS、Linux 以及搭配 WSL 的 Windows。如需更多資訊,請參閱我們關於不支援的環境與備援機制的說明文件。
安裝
Laravel Prompts 已經包含在最新版本的 Laravel 中。
您也可以使用 Composer 套件管理員將 Laravel Prompts 安裝到其他的 PHP 專案中:
composer require laravel/prompts可用的 Prompts
Text
text 函式會使用給定的問題提示使用者、接收其輸入,然後將其傳回:
use function Laravel\Prompts\text;

$name = text('What is your name?');您也可以包含預留位置文字、預設值以及提示資訊:
$name = text(
    label: 'What is your name?',
    placeholder: 'E.g. Taylor Otwell',
    default: $user?->name,
    hint: 'This will be displayed on your profile.'
);必填值
若您需要強制輸入值,可以傳遞 required 引數:
$name = text(
    label: 'What is your name?',
    required: true
);若您想要自訂驗證訊息,也可以傳遞字串:
$name = text(
    label: 'What is your name?',
    required: 'Your name is required.'
);額外驗證
最後,若您想要執行額外的驗證邏輯,可以傳遞閉包給 validate 引數:
$name = text(
    label: 'What is your name?',
    validate: fn (string $value) => match (true) {
        strlen($value) < 3 => 'The name must be at least 3 characters.',
        strlen($value) > 255 => 'The name must not exceed 255 characters.',
        default => null
    }
);該閉包將會接收輸入的值,並可傳回錯誤訊息;若驗證通過,則傳回 null。
另一種方式是,您可以善用 Laravel 驗證器 的強大功能。若要這麼做,請向 validate 引數提供一個包含屬性名稱與所需驗證規則的陣列:
$name = text(
    label: 'What is your name?',
    validate: ['name' => 'required|max:255|unique:users']
);Textarea
textarea 函式會使用給定的問題提示使用者,透過多行文字區域接收其輸入,然後將其傳回:
use function Laravel\Prompts\textarea;

$story = textarea('Tell me a story.');您也可以包含預留位置文字、預設值以及提示資訊:
$story = textarea(
    label: 'Tell me a story.',
    placeholder: 'This is a story about...',
    hint: 'This will be displayed on your profile.'
);必填值
若您需要強制輸入值,可以傳遞 required 引數:
$story = textarea(
    label: 'Tell me a story.',
    required: true
);若您想要自訂驗證訊息,也可以傳遞字串:
$story = textarea(
    label: 'Tell me a story.',
    required: 'A story is required.'
);額外驗證
最後,若您想要執行額外的驗證邏輯,可以傳遞閉包給 validate 引數:
$story = textarea(
    label: 'Tell me a story.',
    validate: fn (string $value) => match (true) {
        strlen($value) < 250 => 'The story must be at least 250 characters.',
        strlen($value) > 10000 => 'The story must not exceed 10,000 characters.',
        default => null
    }
);該閉包將會接收輸入的值,並可傳回錯誤訊息;若驗證通過,則傳回 null。
另一種方式是,您可以善用 Laravel 驗證器 的強大功能。若要這麼做,請向 validate 引數提供一個包含屬性名稱與所需驗證規則的陣列:
$story = textarea(
    label: 'Tell me a story.',
    validate: ['story' => 'required|max:10000']
);Number
number 函式會使用給定的問題提示使用者,接收其數字輸入,然後將其傳回。number 函式允許使用者使用上與下箭頭鍵來操作調整數字:
use function Laravel\Prompts\number;

$number = number('How many copies would you like?');您也可以包含預留位置文字、預設值以及提示資訊:
$name = number(
    label: 'How many copies would you like?',
    placeholder: '5',
    default: 1,
    hint: 'This will be determine how many copies to create.'
);必填值
若您需要強制輸入值,可以傳遞 required 引數:
$copies = number(
    label: 'How many copies would you like?',
    required: true
);若您想要自訂驗證訊息,也可以傳遞字串:
$copies = number(
    label: 'How many copies would you like?',
    required: 'A number of copies is required.'
);額外驗證
最後,若您想要執行額外的驗證邏輯,可以傳遞閉包給 validate 引數:
$copies = number(
    label: 'How many copies would you like?',
    validate: fn (?int $value) => match (true) {
        $value < 1 => 'At least one copy is required.',
        $value > 100 => 'You may not create more than 100 copies.',
        default => null
    }
);該閉包將會接收輸入的值,並可傳回錯誤訊息;若驗證通過,則傳回 null。
另一種方式是,您可以善用 Laravel 驗證器 的強大功能。若要這麼做,請向 validate 引數提供一個包含屬性名稱與所需驗證規則的陣列:
$copies = number(
    label: 'How many copies would you like?',
    validate: ['copies' => 'required|integer|min:1|max:100']
);Password
password 函式與 text 函式類似,但使用者在主控台中打字時,其輸入將會被遮蔽。這在詢問密碼等敏感資訊時非常有用:
use function Laravel\Prompts\password;

$password = password('What is your password?');您也可以包含預留位置文字與提示資訊:
$password = password(
    label: 'What is your password?',
    placeholder: 'password',
    hint: 'Minimum 8 characters.'
);必填值
若您需要強制輸入值,可以傳遞 required 引數:
$password = password(
    label: 'What is your password?',
    required: true
);若您想要自訂驗證訊息,也可以傳遞字串:
$password = password(
    label: 'What is your password?',
    required: 'The password is required.'
);額外驗證
最後,若您想要執行額外的驗證邏輯,可以傳遞閉包給 validate 引數:
$password = password(
    label: 'What is your password?',
    validate: fn (string $value) => match (true) {
        strlen($value) < 8 => 'The password must be at least 8 characters.',
        default => null
    }
);該閉包將會接收輸入的值,並可傳回錯誤訊息;若驗證通過,則傳回 null。
另一種方式是,您可以善用 Laravel 驗證器 的強大功能。若要這麼做,請向 validate 引數提供一個包含屬性名稱與所需驗證規則的陣列:
$password = password(
    label: 'What is your password?',
    validate: ['password' => 'min:8']
);Confirm
若您需要詢問使用者「是或否 (yes or no)」的確認,可以使用 confirm 函式。使用者可以使用方向鍵或按下 y 或 n 來選擇回應。此函式將回傳 true 或 false。
use function Laravel\Prompts\confirm;

$confirmed = confirm('Do you accept the terms?');您也可以包含預設值、自訂「是」與「否」標籤的文字,以及提示資訊:
$confirmed = confirm(
    label: 'Do you accept the terms?',
    default: false,
    yes: 'I accept',
    no: 'I decline',
    hint: 'The terms must be accepted to continue.'
);強制要求選擇「是」
如有需要,您可以透過傳遞 required 引數來強制使用者選擇「是」:
$confirmed = confirm(
    label: 'Do you accept the terms?',
    required: true
);若您想要自訂驗證訊息,也可以傳遞字串:
$confirmed = confirm(
    label: 'Do you accept the terms?',
    required: 'You must accept the terms to continue.'
);Select
若您需要使用者從預定義的一組選項中進行選擇,可以使用 select 函式:
use function Laravel\Prompts\select;

$role = select(
    label: 'What role should the user have?',
    options: ['Member', 'Contributor', 'Owner']
);您也可以指定預設選項與提示資訊:
$role = select(
    label: 'What role should the user have?',
    options: ['Member', 'Contributor', 'Owner'],
    default: 'Owner',
    hint: 'The role may be changed at any time.'
);您也可以傳遞關聯陣列至 options 引數,如此一來將會回傳所選選項的鍵(key)而非其值(value):
$role = select(
    label: 'What role should the user have?',
    options: [
        'member' => 'Member',
        'contributor' => 'Contributor',
        'owner' => 'Owner',
    ],
    default: 'owner'
);在清單開始捲動之前最多會顯示五個選項。您可以透過傳遞 scroll 引數來自訂此數量:
$role = select(
    label: 'Which category would you like to assign?',
    options: Category::pluck('name', 'id'),
    scroll: 10
);次要資訊
info 引數可用於顯示目前高亮選項的附加資訊。當提供閉包(closure)時,它將接收目前高亮選項的值,並應回傳字串或 null:
$role = select(
    label: 'What role should the user have?',
    options: [
        'member' => 'Member',
        'contributor' => 'Contributor',
        'owner' => 'Owner',
    ],
    info: fn (string $value) => match ($value) {
        'member' => 'Can view and comment.',
        'contributor' => 'Can view, comment, and edit.',
        'owner' => 'Full access to all resources.',
        default => null,
    }
);如果資訊不取決於高亮選項,您也可以傳遞靜態字串至 info 引數:
$role = select(
    label: 'What role should the user have?',
    options: ['Member', 'Contributor', 'Owner'],
    info: 'The role may be changed at any time.'
);額外驗證
與其他 Prompt 函式不同,select 函式不接受 required 引數,因為它不可能什麼都不選。然而,如果您需要提供某個選項但防止它被選取,可以傳遞閉包至 validate 引數:
$role = select(
    label: 'What role should the user have?',
    options: [
        'member' => 'Member',
        'contributor' => 'Contributor',
        'owner' => 'Owner',
    ],
    validate: fn (string $value) =>
        $value === 'owner' && User::where('role', 'owner')->exists()
            ? 'An owner already exists.'
            : null
);若 options 引數是關聯陣列,閉包將接收所選的鍵,否則將接收所選的值。此閉包可以回傳錯誤訊息,或在驗證通過時回傳 null。
Multi-select
若您需要使用者能夠選取多個選項,可以使用 multiselect 函式:
use function Laravel\Prompts\multiselect;

$permissions = multiselect(
    label: 'What permissions should be assigned?',
    options: ['Read', 'Create', 'Update', 'Delete']
);您也可以指定預設選項與提示資訊:
use function Laravel\Prompts\multiselect;

$permissions = multiselect(
    label: 'What permissions should be assigned?',
    options: ['Read', 'Create', 'Update', 'Delete'],
    default: ['Read', 'Create'],
    hint: 'Permissions may be updated at any time.'
);您也可以傳遞關聯陣列至 options 引數,以回傳所選選項的鍵而非其值:
$permissions = multiselect(
    label: 'What permissions should be assigned?',
    options: [
        'read' => 'Read',
        'create' => 'Create',
        'update' => 'Update',
        'delete' => 'Delete',
    ],
    default: ['read', 'create']
);在清單開始捲動之前最多會顯示五個選項。您可以透過傳遞 scroll 引數來自訂此數量:
$categories = multiselect(
    label: 'What categories should be assigned?',
    options: Category::pluck('name', 'id'),
    scroll: 10
);次要資訊
info 引數可用於顯示目前高亮選項的附加資訊。當提供閉包時,它將接收目前高亮選項的值,並應回傳字串或 null:
$permissions = multiselect(
    label: 'What permissions should be assigned?',
    options: [
        'read' => 'Read',
        'create' => 'Create',
        'update' => 'Update',
        'delete' => 'Delete',
    ],
    info: fn (string $value) => match ($value) {
        'read' => 'View resources and their properties.',
        'create' => 'Create new resources.',
        'update' => 'Modify existing resources.',
        'delete' => 'Permanently remove resources.',
        default => null,
    }
);強制要求選擇值
預設情況下,使用者可以選取零個或多個選項。您可以傳遞 required 引數來改為強制選取一或多個選項:
$categories = multiselect(
    label: 'What categories should be assigned?',
    options: Category::pluck('name', 'id'),
    required: true
);若您想要自訂驗證訊息,可以傳遞字串至 required 引數:
$categories = multiselect(
    label: 'What categories should be assigned?',
    options: Category::pluck('name', 'id'),
    required: 'You must select at least one category'
);額外驗證
如果您需要提供某個選項但防止它被選取,可以傳遞閉包至 validate 引數:
$permissions = multiselect(
    label: 'What permissions should the user have?',
    options: [
        'read' => 'Read',
        'create' => 'Create',
        'update' => 'Update',
        'delete' => 'Delete',
    ],
    validate: fn (array $values) => ! in_array('read', $values)
        ? 'All users require the read permission.'
        : null
);若 options 引數是關聯陣列,則閉包將接收所選的鍵,否則將接收所選的值。此閉包可以回傳錯誤訊息,或在驗證通過時回傳 null。
Suggest
suggest 函式可用於為可能的選項提供自動補全功能。無論自動補全提示為何,使用者依舊可以輸入任何答案:
use function Laravel\Prompts\suggest;

$name = suggest('What is your name?', ['Taylor', 'Dayle']);或者,您可以傳遞一個 Closure 作為 suggest 函式的第二個引數。每當使用者輸入一個字元時,該 Closure 都會被呼叫。該 Closure 應接收一個包含使用者目前輸入內容的字串參數,並回傳一個用於自動補全的選項陣列:
$name = suggest(
    label: 'What is your name?',
    options: fn ($value) => collect(['Taylor', 'Dayle'])
        ->filter(fn ($name) => Str::contains($name, $value, ignoreCase: true))
)您還可以包含預留位置文字、預設值以及資訊提示:
$name = suggest(
    label: 'What is your name?',
    options: ['Taylor', 'Dayle'],
    placeholder: 'E.g. Taylor',
    default: $user?->name,
    hint: 'This will be displayed on your profile.'
);Secondary Information
info 引數可用於顯示當前高亮選項的附加資訊。當提供 Closure 時,它將接收當前高亮選項的值,並應回傳字串或 null:
$name = suggest(
    label: 'What is your name?',
    options: ['Taylor', 'Dayle'],
    info: fn (string $value) => match ($value) {
        'Taylor' => 'Administrator',
        'Dayle' => 'Contributor',
        default => null,
    }
);Required Values
若您需要強制輸入值,可以傳遞 required 引數:
$name = suggest(
    label: 'What is your name?',
    options: ['Taylor', 'Dayle'],
    required: true
);若您想要自訂驗證訊息,也可以傳遞字串:
$name = suggest(
    label: 'What is your name?',
    options: ['Taylor', 'Dayle'],
    required: 'Your name is required.'
);Additional Validation
最後,若您想執行額外的驗證邏輯,可以傳遞一個 Closure 給 validate 引數:
$name = suggest(
    label: 'What is your name?',
    options: ['Taylor', 'Dayle'],
    validate: fn (string $value) => match (true) {
        strlen($value) < 3 => 'The name must be at least 3 characters.',
        strlen($value) > 255 => 'The name must not exceed 255 characters.',
        default => null
    }
);該 Closure 將接收輸入的值,且可以回傳錯誤訊息,或在驗證通過時回傳 null。
或者,您可以利用 Laravel 的 驗證器 強大功能。為此,請向 validate 引數提供一個包含欄位名稱與所需驗證規則的陣列:
$name = suggest(
    label: 'What is your name?',
    options: ['Taylor', 'Dayle'],
    validate: ['name' => 'required|min:3|max:255']
);Search
若您有許多選項供使用者選擇,search 函式允許使用者輸入搜尋關鍵字來過濾結果,然後再使用方向鍵選擇選項:
use function Laravel\Prompts\search;

$id = search(
    label: 'Search for the user that should receive the mail',
    options: fn (string $value) => strlen($value) > 0
        ? User::whereLike('name', "%{$value}%")->pluck('name', 'id')->all()
        : []
);該 Closure 將接收使用者目前為止輸入的文字,並必須回傳一個選項陣列。若您回傳關聯陣列,則會回傳所選選項的鍵 (Key);否則將回傳其值。
在過濾您打算回傳值的陣列時,您應該使用 array_values 函式或 Collection 的 values 方法,以確保陣列不會變成關聯陣列:
$names = collect(['Taylor', 'Abigail']);

$selected = search(
    label: 'Search for the user that should receive the mail',
    options: fn (string $value) => $names
        ->filter(fn ($name) => Str::contains($name, $value, ignoreCase: true))
        ->values()
        ->all(),
);您還可以包含預留位置文字與資訊提示:
$id = search(
    label: 'Search for the user that should receive the mail',
    placeholder: 'E.g. Taylor Otwell',
    options: fn (string $value) => strlen($value) > 0
        ? User::whereLike('name', "%{$value}%")->pluck('name', 'id')->all()
        : [],
    hint: 'The user will receive an email immediately.'
);在列表開始捲動之前,最多會顯示五個選項。您可以透過傳遞 scroll 引數來自訂此數量:
$id = search(
    label: 'Search for the user that should receive the mail',
    options: fn (string $value) => strlen($value) > 0
        ? User::whereLike('name', "%{$value}%")->pluck('name', 'id')->all()
        : [],
    scroll: 10
);Secondary Information
info 引數可用於顯示當前高亮選項的附加資訊。當提供 Closure 時,它將接收當前高亮選項的值,並應回傳字串或 null:
$id = search(
    label: 'Search for the user that should receive the mail',
    options: fn (string $value) => strlen($value) > 0
        ? User::whereLike('name', "%{$value}%")->pluck('name', 'id')->all()
        : [],
    info: fn (int $userId) => User::find($userId)?->email
);Additional Validation
若您想執行額外的驗證邏輯,可以傳遞一個 Closure 給 validate 引數:
$id = search(
    label: 'Search for the user that should receive the mail',
    options: fn (string $value) => strlen($value) > 0
        ? User::whereLike('name', "%{$value}%")->pluck('name', 'id')->all()
        : [],
    validate: function (int|string $value) {
        $user = User::findOrFail($value);

        if ($user->opted_out) {
            return 'This user has opted-out of receiving mail.';
        }
    }
);若 options Closure 回傳關聯陣列,則該 Closure 將接收選取的鍵;否則,它將接收選取的值。該 Closure 可以回傳錯誤訊息,或在驗證通過時回傳 null。
Multi-search
如果你有許多可搜尋的選項,且需要讓使用者能夠選擇多個項目,multisearch 函式允許使用者輸入搜尋查詢來過濾結果,接著再使用方向鍵與空白鍵來選擇選項:
use function Laravel\Prompts\multisearch;

$ids = multisearch(
    'Search for users who should receive the mail',
    fn (string $value) => strlen($value) > 0
        ? User::whereLike('name', "%{$value}%")->pluck('name', 'id')->all()
        : []
);該閉包將接收使用者目前為止所輸入的文字,且必須回傳一個選項陣列。若你回傳關聯陣列,則會回傳所選選項的鍵(Key);否則,將改為回傳選項的值。
當過濾打算回傳值的陣列時,你應該使用 array_values 函式或 Collection 的 values 方法,以確保該陣列不會變成關聯陣列:
$names = collect(['Taylor', 'Abigail']);

$selected = multisearch(
    label: 'Search for users who should receive the mail',
    options: fn (string $value) => $names
        ->filter(fn ($name) => Str::contains($name, $value, ignoreCase: true))
        ->values()
        ->all(),
);你也可以包含預設提示文字(Placeholder)與提示訊息:
$ids = multisearch(
    label: 'Search for users who should receive the mail',
    placeholder: 'E.g. Taylor Otwell',
    options: fn (string $value) => strlen($value) > 0
        ? User::whereLike('name', "%{$value}%")->pluck('name', 'id')->all()
        : [],
    hint: 'The user will receive an email immediately.'
);在列表開始捲動之前最多會顯示五個選項。你可以透過傳遞 scroll 引數來自訂此設定:
$ids = multisearch(
    label: 'Search for the users that should receive the mail',
    options: fn (string $value) => strlen($value) > 0
        ? User::whereLike('name', "%{$value}%")->pluck('name', 'id')->all()
        : [],
    scroll: 10
);次要資訊
info 引數可用於顯示目前高亮選項的額外資訊。當提供閉包時,它將接收當前高亮選項的值,並應回傳字串或 null:
$ids = multisearch(
    label: 'Search for the users that should receive the mail',
    options: fn (string $value) => strlen($value) > 0
        ? User::whereLike('name', "%{$value}%")->pluck('name', 'id')->all()
        : [],
    info: fn (int $userId) => User::find($userId)?->email
);必填值
預設情況下,使用者可以選擇零個或多個選項。你可以傳遞 required 引數來強制要求至少選擇一個或多個選項:
$ids = multisearch(
    label: 'Search for the users that should receive the mail',
    options: fn (string $value) => strlen($value) > 0
        ? User::whereLike('name', "%{$value}%")->pluck('name', 'id')->all()
        : [],
    required: true
);若你想自訂驗證訊息,也可以向 required 引數傳遞字串:
$ids = multisearch(
    label: 'Search for the users that should receive the mail',
    options: fn (string $value) => strlen($value) > 0
        ? User::whereLike('name', "%{$value}%")->pluck('name', 'id')->all()
        : [],
    required: 'You must select at least one user.'
);額外驗證
若你想執行額外的驗證邏輯,可以傳遞閉包給 validate 引數:
$ids = multisearch(
    label: 'Search for the users that should receive the mail',
    options: fn (string $value) => strlen($value) > 0
        ? User::whereLike('name', "%{$value}%")->pluck('name', 'id')->all()
        : [],
    validate: function (array $values) {
        $optedOut = User::whereLike('name', '%a%')->findMany($values);

        if ($optedOut->isNotEmpty()) {
            return $optedOut->pluck('name')->join(', ', ', and ').' have opted out.';
        }
    }
);若 options 閉包回傳一個關聯陣列,則該閉包將接收所選的鍵;否則,將接收所選的值。該閉包可以回傳錯誤訊息,或者在驗證通過時回傳 null。
Pause
pause 函式可用於向使用者顯示資訊文字,並等待他們按下 Enter / Return 鍵確認是否要繼續:
use function Laravel\Prompts\pause;

pause('Press ENTER to continue.');Autocomplete
autocomplete 函式可用於為可能的選項提供行內自動完成(Auto-completion)。當使用者輸入時,符合其輸入的建議將以淡色文字(Ghost text)顯示,使用者可以透過按下 Tab 鍵或右方向鍵來接受建議:
use function Laravel\Prompts\autocomplete;

$name = autocomplete(
    label: 'What is your name?',
    options: ['Taylor', 'Dayle', 'Jess', 'Nuno', 'Tim']
);你也可以包含預設提示文字(Placeholder)、預設值以及資訊提示:
$name = autocomplete(
    label: 'What is your name?',
    options: ['Taylor', 'Dayle', 'Jess', 'Nuno', 'Tim'],
    placeholder: 'E.g. Taylor',
    default: $user?->name,
    hint: 'Use tab to accept, up/down to cycle.'
);動態選項
你也可以傳遞閉包,根據使用者的輸入動態產生選項。每當使用者輸入一個字元時都會呼叫該閉包,且該閉包應回傳一個自動完成的選項陣列:
$file = autocomplete(
    label: 'Which file?',
    options: fn (string $value) => collect($files)
        ->filter(fn ($file) => str_starts_with(strtolower($file), strtolower($value)))
        ->values()
        ->all(),
);必填值
若你要求必須輸入數值,可以傳遞 required 引數:
$name = autocomplete(
    label: 'What is your name?',
    options: ['Taylor', 'Dayle', 'Jess', 'Nuno', 'Tim'],
    required: true
);若你想自訂驗證訊息,也可以傳遞字串:
$name = autocomplete(
    label: 'What is your name?',
    options: ['Taylor', 'Dayle', 'Jess', 'Nuno', 'Tim'],
    required: 'Your name is required.'
);額外驗證
最後,若你想執行額外的驗證邏輯,可以傳遞閉包給 validate 引數:
$name = autocomplete(
    label: 'What is your name?',
    options: ['Taylor', 'Dayle', 'Jess', 'Nuno', 'Tim'],
    validate: fn (string $value) => match (true) {
        strlen($value) < 3 => 'The name must be at least 3 characters.',
        strlen($value) > 255 => 'The name must not exceed 255 characters.',
        default => null
    }
);該閉包將接收已輸入的值,並可以回傳錯誤訊息,或者在驗證通過時回傳 null。
在驗證前轉換輸入
有時候您可能會希望在進行驗證前先轉換提示輸入。例如,您可能希望去除所提供字串的空白字元。為了實現這一點,許多提示函式都提供了 transform 引數,該引數接收一個閉包 (closure):
$name = text(
    label: 'What is your name?',
    transform: fn (string $value) => trim($value),
    validate: fn (string $value) => match (true) {
        strlen($value) < 3 => 'The name must be at least 3 characters.',
        strlen($value) > 255 => 'The name must not exceed 255 characters.',
        default => null
    }
);表單
通常,您會有一連串按順序顯示的提示,用於在執行其他操作前收集資訊。您可以使用 form 函式來建立一組群組化的提示供使用者填寫:
use function Laravel\Prompts\form;

$responses = form()
    ->text('What is your name?', required: true)
    ->password('What is your password?', validate: ['password' => 'min:8'])
    ->confirm('Do you accept the terms?')
->submit();submit 方法會回傳一個包含表單中所有提示回應的數字索引陣列。不過,您也可以透過 name 引數為每個提示指定名稱。當提供名稱後,該命名提示的回應就可以透過該名稱來存取:
use App\Models\User;
use function Laravel\Prompts\form;

$responses = form()
    ->text('What is your name?', required: true, name: 'name')
    ->password(
        label: 'What is your password?',
        validate: ['password' => 'min:8'],
        name: 'password'
    )
    ->confirm('Do you accept the terms?')
    ->submit();

User::create([
    'name' => $responses['name'],
    'password' => $responses['password'],
]);使用 form 函式的主要好處是使用者可以使用 CTRL + U 返回表單中的上一個提示。這讓使用者可以修正錯誤或修改選擇,而不需要取消並重新開始整個表單。
如果您需要對表單中的提示進行更細緻的控制,您可以呼叫 add 方法,而不是直接呼叫其中一個提示函式。add 方法會接收使用者先前提供的所有回應:
use function Laravel\Prompts\form;
use function Laravel\Prompts\outro;
use function Laravel\Prompts\text;

$responses = form()
    ->text('What is your name?', required: true, name: 'name')
    ->add(function ($responses) {
        return text("How old are you, {$responses['name']}?");
    }, name: 'age')
    ->submit();

outro("Your name is {$responses['name']} and you are {$responses['age']} years old.");資訊訊息
note、info、warning、error 與 alert 函式可用於顯示資訊訊息:
use function Laravel\Prompts\info;

info('Package installed successfully.');Callouts
callout 函式會顯示一個帶有標籤和內容的方框訊息。Callouts 非常適合用於顯示需要特別醒目的重要資訊,例如部署摘要、錯誤詳細資訊或狀態更新:
use function Laravel\Prompts\callout;

callout(
    label: 'Environment Configured',
    content: 'Your application is running in production mode with 4 workers.',
);您可以將 warning 或 error 作為 type 引數傳入,以改變 callout 的視覺樣式:
callout(
    label: 'Deprecation Notice',
    content: 'The `--prefer-stable` flag will be removed in v4.0. Use `--stability=stable` instead.',
    type: 'warning',
);

callout(
    label: 'Database Connection Failed',
    content: 'Could not connect to MySQL on 127.0.0.1:3306.',
    type: 'error',
);info 引數會在 callout 底部新增一行頁腳,這對於顯示 ID 或時間戳記等元資料 (metadata) 非常有用:
callout(
    label: 'Deployment Summary',
    content: 'Your application was deployed to production.',
    info: 'deploy-id: d4f8a2c',
);豐富內容
除了傳入字串之外,您還可以傳入包含字串與元素的陣列來建構豐富且結構化的 callout。Element 類別提供了工廠方法來建立標題、項目符號清單、編號清單、鍵值對清單以及連結:
use Laravel\Prompts\Elements\Element;

use function Laravel\Prompts\callout;

callout('Deployment Summary', [
    'Your application was deployed to production at 2024-03-15 14:32 UTC.',
    Element::heading('What Changed'),
    Element::bulletedList([
        'Migrated 3 pending database migrations',
        'Cleared and rebuilt route cache',
        'Restarted 4 queue workers',
    ]),
    Element::heading('Next Steps'),
    Element::numberedList([
        'Verify the health check endpoint at /up',
        'Monitor error rates for the next 15 minutes',
        'Confirm background jobs are processing',
    ]),
]);您也可以使用 Element::keyValueList 來顯示帶有標籤的資料:
callout('Database Connection Failed', [
    'Could not connect to the database server.',
    Element::keyValueList([
        'Host' => '127.0.0.1',
        'Port' => '3306',
        'Database' => 'forge',
        'Status' => 'Connection refused',
    ]),
], type: 'error');Element::link 方法能在支援 OSC 8 的終端機中建立可點擊的超連結。您可以僅提供 URL,或者提供帶有自訂標籤的 URL:
callout('Server Health Check', [
    'Multiple services are reporting degraded performance.',
    Element::heading('Affected Services'),
    'Look here: '.Element::link('https://example.com/health', 'Health Dashboard'),
    Element::link('https://example.com/health'),
]);如果未提供標籤,則 URL 本身將作為連結文字顯示。
表格
table 函式讓您可以輕鬆顯示包含多列多欄的資料。您只需要提供欄位名稱以及表格的資料即可:
use function Laravel\Prompts\table;

table(
    headers: ['Name', 'Email'],
    rows: User::all(['name', 'email'])->toArray()
);Spin
spin 函式會在執行指定的隨附回呼函式時顯示轉圈動畫 (spinner) 以及可選的訊息。它用於表示正在進行中的行程,並在完成時傳回回呼函式的結果:
use function Laravel\Prompts\spin;

$response = spin(
    callback: fn () => Http::get('http://example.com'),
    message: 'Fetching response...'
);⚠️ 警告
spin 函式需要 PCNTL PHP 擴充套件才能顯示動態的 spinner。當此擴充套件不可用時,將改為顯示靜態版本的 spinner。
進度條
對於執行時間較長的任務,顯示進度條以告知使用者任務的完成進度非常有幫助。使用 progress 函式,Laravel 會顯示進度條,並在給定的可疊代(iterable)值進行每次迭代時推進其進度:
use function Laravel\Prompts\progress;

$users = progress(
    label: 'Updating users',
    steps: User::all(),
    callback: fn ($user) => $this->performTask($user)
);progress 函式的運作方式類似於 map 函式,並會回傳一個包含每次回呼(callback)迭代回傳值的陣列。
回呼也可以接收 Laravel\Prompts\Progress 實例,讓您能在每次迭代時修改標籤(label)與提示(hint):
$users = progress(
    label: 'Updating users',
    steps: User::all(),
    callback: function ($user, $progress) {
        $progress
            ->label("Updating {$user->name}")
            ->hint("Created on {$user->created_at}");

        return $this->performTask($user);
    },
    hint: 'This may take some time.'
);有時候,您可能需要更手動地控制進度條的推進方式。首先,定義此程序將迭代的總步驟數。接著,在處理完每個項目後,透過 advance 方法推進進度條:
$progress = progress(label: 'Updating users', steps: 10);

$users = User::all();

$progress->start();

foreach ($users as $user) {
    $this->performTask($user);

    $progress->advance();
}

$progress->finish();Task
task 函式會在執行給定的回呼時,顯示一個帶有標籤、載入旋轉圖示(spinner)以及可滾動的即時輸出區域之任務。它非常適合包裹執行時間較長的程序(例如依賴套件安裝或部署腳本),提供目前處理進度的即時可視化:
use function Laravel\Prompts\task;

task(
    label: 'Installing dependencies',
    callback: function ($logger) {
        // Long-running process...
    }
);回呼會接收一個 Logger 實例,您可以用它在任務的輸出區域中顯示日誌行、狀態訊息和串流文字。
⚠️ 警告
task 函式需要 PCNTL PHP 擴充套件來讓旋轉圖示動畫化。當該擴充套件不可用時,將改為顯示靜態版本的任務。
寫入日誌訊息
line 方法會將單行日誌寫入任務的可滾動輸出區域:
task(
    label: 'Installing dependencies',
    callback: function ($logger) {
        $logger->line('Resolving packages...');
        // ...
        $logger->line('Downloading laravel/framework');
        // ...
    }
);狀態訊息
您可以使用 success、warning 和 error 方法來顯示狀態訊息。這些訊息會以固定且高亮的方式顯示在可滾動日誌區域上方:
task(
    label: 'Deploying application',
    callback: function ($logger) {
        $logger->line('Pulling latest changes...');
        // ...
        $logger->success('Changes pulled!');

        $logger->line('Running migrations...');
        // ...
        $logger->warning('No new migrations to run.');

        $logger->line('Clearing cache...');
        // ...
        $logger->success('Cache cleared!');
    }
);更新標籤
label 方法允許您在任務執行時更新任務的標籤:
task(
    label: 'Starting deployment...',
    callback: function ($logger) {
        $logger->label('Pulling latest changes...');
        // ...
        $logger->label('Running migrations...');
        // ...
        $logger->label('Clearing cache...');
        // ...
    }
);顯示副標籤
subLabel 方法會在任務的主標籤下方顯示一行淡色文字,這對於傳達臨時狀態(例如目前正在進行的步驟)非常實用。傳入空字串即可清除副標籤:
task(
    label: 'Deploying',
    callback: function ($logger) {
        $logger->subLabel('Building assets...');
        // ...
        $logger->subLabel('Running migrations...');
        // ...
        $logger->subLabel('');
    }
);您也可以透過 subLabel 引數提供初始的副標籤:
task(
    label: 'Deploying',
    callback: function ($logger) {
        // ...
    },
    subLabel: 'Preparing...'
);串流文字
對於會漸進式產生輸出的程序(例如 AI 生成的回應),partial 方法允許您以逐字或逐區塊的方式串流文字。當串流完成後,請呼叫 commitPartial 來完成最終輸出:
task(
    label: 'Generating response...',
    callback: function ($logger) {
        foreach ($words as $word) {
            $logger->partial($word . ' ');
        }

        $logger->commitPartial();
    }
);自訂輸出限制
預設情況下,任務最多顯示 10 行可滾動的輸出。您可以透過 limit 引數進行自訂:
task(
    label: 'Installing dependencies',
    callback: function ($logger) {
        // ...
    },
    limit: 20
);保留摘要
預設情況下,一旦回呼執行完畢,任務的輸出就會被清除。若您希望在任務完成後將狀態訊息保留在螢幕上,可以傳入 keepSummary 引數:
task(
    label: 'Deploying',
    callback: function ($logger) {
        $logger->success('Assets built');
        // ...
        $logger->success('Migrations complete');
    },
    keepSummary: true,
);Stream
stream 函式可以在終端機中顯示串流輸入的文字,非常適合顯示 AI 生成的內容或任何漸進式到達的文字:
use function Laravel\Prompts\stream;

$stream = stream();

foreach ($words as $word) {
    $stream->append($word . ' ');
    usleep(25_000); // Simulate delay between chunks...
}

$stream->close();append 方法會將文字新增到串流中,並以漸進淡入效果呈現。當所有內容都串流完畢後,請呼叫 close 方法以完成輸出並恢復游標。
終端機標題
title 函式會更新使用者終端機視窗或分頁的標題:
use function Laravel\Prompts\title;

title('Installing Dependencies');若要將終端機標題重置回預設值,請傳入空字串:
title('');清除終端機
clear 函式可用於清除使用者的終端機畫面:
use function Laravel\Prompts\clear;

clear();終端機注意事項
終端機寬度
如果任何標籤、選項或驗證訊息的長度超過使用者終端機中的「欄數(columns)」,系統將會自動截斷以符合寬度。若您的使用者可能使用較窄的終端機,請考慮縮短這些字串的長度。通常較安全的最大長度為 74 個字元,以支援 80 個字元寬度的終端機。
終端機高度
對於任何接受 scroll 引數的 Prompt,設定的值會自動縮減以適應使用者終端機的高度(包含預留給驗證訊息的空間)。
不支援的環境與備援機制
Laravel Prompts 支援 macOS、Linux 以及搭配 WSL 的 Windows。由於 Windows 版本 PHP 的限制,目前無法在 WSL 之外的 Windows 環境中使用 Laravel Prompts。
因此,Laravel Prompts 支援備援機制,可退回使用如 Symfony Console Question Helper 等替代實作方式。
📌 備註
在 Laravel 框架中使用 Laravel Prompts 時,已為每個 prompt 設定好備援機制,並會在不支援的環境中自動啟用。
備援條件
若您未使用 Laravel,或是需要自訂何時使用備援行為,您可以傳送一個布林值給 Prompt 類別的 fallbackWhen 靜態方法:
use Laravel\Prompts\Prompt;

Prompt::fallbackWhen(
    ! $input->isInteractive() || windows_os() || app()->runningUnitTests()
);備援行為
若您未使用 Laravel,或是需要自訂備援行為,您可以傳送一個閉包給每個 prompt 類別的 fallbackUsing 靜態方法:
use Laravel\Prompts\TextPrompt;
use Symfony\Component\Console\Question\Question;
use Symfony\Component\Console\Style\SymfonyStyle;

TextPrompt::fallbackUsing(function (TextPrompt $prompt) use ($input, $output) {
    $question = (new Question($prompt->label, $prompt->default ?: null))
        ->setValidator(function ($answer) use ($prompt) {
            if ($prompt->required && $answer === null) {
                throw new \RuntimeException(
                    is_string($prompt->required) ? $prompt->required : 'Required.'
                );
            }

            if ($prompt->validate) {
                $error = ($prompt->validate)($answer ?? '');

                if ($error) {
                    throw new \RuntimeException($error);
                }
            }

            return $answer;
        });

    return (new SymfonyStyle($input, $output))
        ->askQuestion($question);
});必須為每個 prompt 類別單獨設定備援機制。該閉包將接收 prompt 類別的實例,且必須傳回適合該 prompt 的型別。
測試
Laravel 提供了多種方法,用於測試您的命令是否顯示了預期的 Prompt 訊息:
test('report generation', function () {
    $this->artisan('report:generate')
        ->expectsPromptsInfo('Welcome to the application!')
        ->expectsPromptsWarning('This action cannot be undone')
        ->expectsPromptsError('Something went wrong')
        ->expectsPromptsAlert('Important notice!')
        ->expectsPromptsIntro('Starting process...')
        ->expectsPromptsOutro('Process completed!')
        ->expectsPromptsTable(
            headers: ['Name', 'Email'],
            rows: [
                ['Taylor Otwell', '[email protected]'],
                ['Jason Beggs', '[email protected]'],
            ]
        )
        ->assertExitCode(0);
});public function test_report_generation(): void
{
$this->artisan('report:generate')
->expectsPromptsInfo('Welcome to the application!')
->expectsPromptsWarning('This action cannot be undone')
->expectsPromptsError('Something went wrong')
->expectsPromptsAlert('Important notice!')
->expectsPromptsIntro('Starting process...')
->expectsPromptsOutro('Process completed!')
->expectsPromptsTable(
headers: ['Name', 'Email'],
rows: [
['Taylor Otwell', '[email protected]'],
['Jason Beggs', '[email protected]'],
]
)
->assertExitCode(0);
}